 Spine Bookbinding Tape
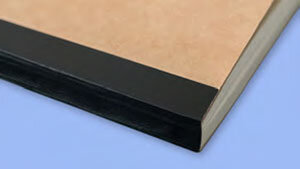
Linson embossed spine bookbinding tape is a traditional product stocked in five colours. It is a self adhesive gummed paper tape with an embossed linen texture to resemble original coloured fabric bindings. Spine tape has a lower initial tack with a longer curing process to reach full adhesion strength.
How do you apply spine bookbinding tape?
Applying spine bookbinding tape is a straightforward process, and it typically involves securing the spine of a book to provide reinforcement and a neat appearance. Here’s a step-by-step guide on how to apply spine bookbinding tape:
Materials Needed:
- Bookbinding tape
- Book to be bound
- Sharp knife or scissors
- Bone folder or flat edge tool
- Cutting mat or surface
Procedure:
- Prepare the Book:
- Ensure that the pages of the book are aligned and in the correct order.
- If the book is newly bound or repaired, make sure the spine is clean and free of any adhesive residue.
- Measure the Tape:
- Cut a piece of bookbinding tape that is slightly longer than the height of the book. The tape should cover the entire spine with a little excess on the top and bottom.
- Position the Tape:
- Place the bookbinding tape on a flat, clean surface with the adhesive side facing up.
- Position the book on top of the tape, ensuring that the tape covers the entire spine.
- Centre the Book:
- Align the book on the tape so that there is an equal amount of excess tape extending beyond the top and bottom edges of the book.
- Attach the Tape:
- Lift one side of the book, exposing the adhesive side of the tape.
- Starting from the centre, press the tape onto the spine of the book, smoothing it down to adhere evenly.
- Repeat the process for the other side of the book, ensuring that the tape is securely attached along the entire length of the spine.
- Fold the Excess Tape:
- Carefully fold the excess tape over the top and bottom edges of the book. This helps reinforce the ends of the spine and provides a clean finish.
- Burnish the Tape:
- Use a bone folder or a flat edge tool to burnish the tape, ensuring that it adheres well to the spine and the book’s cover. Run the tool along the length of the spine to remove air bubbles and create a smooth finish.
- Trim Excess Tape:
- Trim any excess tape from the top and bottom edges of the book using a craft knife or scissors. Make sure the edges are neat and even.
- Allow Time to Set:
- Allow the bookbinding tape to set and adhere properly. This may involve pressing the book under some weight or using a book press if available.
Following these steps should result in a neatly bound book with a reinforced spine. Keep in mind that the specific instructions may vary slightly depending on the type of bookbinding tape you are using, so it’s always a good idea to check the manufacturer’s recommendations.